Monday, August 29, 2011
Friday, August 26, 2011
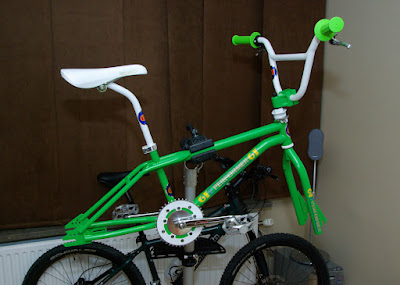
First ride in...20 years
Tonight I tightened everything up and...
...went for a quick ride.
Felt nice... damn nice :)
Although I might remove the frame standers, as my heels have a tendency to catch them. But probably just a case of getting used to them being there again.
...went for a quick ride.
Felt nice... damn nice :)
Although I might remove the frame standers, as my heels have a tendency to catch them. But probably just a case of getting used to them being there again.
A'ME Bubble font
Managed to pick up a pair of green A'ME Tri grips, from one of the guys on RadBMX, with the older bubble font for the build, to replace the new reproduction A'me Rounds that are currently on it.
The only things that's not from the '80s on the bike is the reproduction Dominator seat, and the reproduction Tecmatic bottom bracket.
If a green GT seat falls from heaven, then the Dominator will be sold on, but the bottom bracket will be staying put :)
The only things that's not from the '80s on the bike is the reproduction Dominator seat, and the reproduction Tecmatic bottom bracket.
If a green GT seat falls from heaven, then the Dominator will be sold on, but the bottom bracket will be staying put :)
Labels:
A'ME,
Ame,
Bubble Font,
GT Pro Performer,
Round,
Tri
Tuesday, August 16, 2011
Araya Rims :(
Darn, looks like I'll need to get one of the rims repowdered. The finish came out great, but when I was applying the Araya decal I noticed black lines in the powder :(
I used a pen to highlight some minor flaws on the rims that needed some work. Seems the pen marks weren't completely removed before powdering and now the pigment from the pen has come through the white on one rim.
Suck :( But it so light and tricky to see it's probably not worth redoing...
I used a pen to highlight some minor flaws on the rims that needed some work. Seems the pen marks weren't completely removed before powdering and now the pigment from the pen has come through the white on one rim.
Suck :( But it so light and tricky to see it's probably not worth redoing...
Saturday, August 13, 2011
Reproduction Tecmatic
Installed the reproduction Tecmatic bottom bracket. Seems nice, although it was tight to get the threaded bolts on to the original shaft, but it got there in the end ok.
GT Power Disk
The GT Power Disk was originally black, and in need of help. A few heavy scratches unfortunately meant that it would need polishing out and losing the GT wings.
Before:
SBD did his magic and repowdered it GT green, and I managed to get decals made to replace the GT wings. For the placement I marked out a grid with thread and sprayed soapy water on to the disk to let me position the decals easily.
And lastly remounted with the decals in place:
Before:
SBD did his magic and repowdered it GT green, and I managed to get decals made to replace the GT wings. For the placement I marked out a grid with thread and sprayed soapy water on to the disk to let me position the decals easily.
And lastly remounted with the decals in place:
First build up
Most of the stuff on is final apart from the wheels/hubs.
But it's really starting to come together nicely :)
But it's really starting to come together nicely :)
Friday, August 12, 2011
Spokes... and how long?
Well that is the question....
I need to calculate the length of spokes I need for the GT Superlace hubs. Plenty of calculators out there at least, so I guess I'll try a few to make sure I get the same result for both.
At a guess it's probably 190mm front and 188mm rear for a 4x pattern.
In the mean time I'll build the bike up using the freewheel Araya Aero I have, and since they're still alloy it will be very close to the bitd look for the bike.
Thursday, August 11, 2011
Gyro friendly GT Epoch
Well now that I'll run the Gyro, there is a minor issue using the GT Epoch headset.... the shit don't fit!
The top cap on the standard GT Epoch sits over the upper bearing cup and, as such, is too wide for the Gyro bearings to pass over. So there is a gyro friendly top cap that sits flush with the upper bearing cup...
If only life was that simple... no.
GT in their 1980's wisdom also modified the upper bearing cone ever so slighty so too. Anyway to cut a long story short I finally managed to get a matching Gyro friendly upper cone.
Original GT Epoch cone and top cap: (Race)
Gyro friendly GT Epoch cone and top cap: (Freestyle)
Cone side by side: (Freestyle left /Race right)
Freestyle Epoch top cap on the Race cone: (Large gap)
Race GT Epoch top cap on the Race cone: (As it should be)
Freestyle GT Epoch top cap on the Freestyle cone: (As it should be)
The three top caps together: (White Freestyle left /Chrome Race middle/ Chrome Freestyle right)
And yep I'll be using the white top cap...
Labels:
GT Epoch,
GT Pro Performer,
Gyro friendly,
Odyssey Gyro
Wednesday, August 10, 2011
History lesson
Got a bit of history on my frame & forks (1085xxxx). Turned out before getting powdered white and me buying it, the bike was a find in a thrift shop in Georgetown, Texas and had a bit of a tasty rattle can finish...
From this:
To this:
and finally to this:
From this:
To this:
and finally to this:
GT Superlace
Some GT Superlace hubs that arrived this week. Now I can get the wheels and hubs measure and work out the size of spokes I need to get. 4X pattern...
Front Brake
When I updated the Nippon with the heavy duty Allen-key spindles I could only find rears :(
Which meant the front was too short... arse!
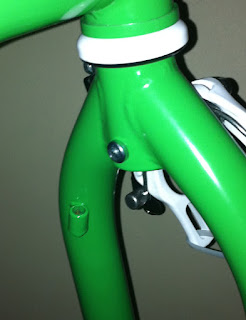
But one solution was to run a rear spindle on the front with a Dia Compe recessed nut. Having that on my Performer bitd might have spared a pair of Vans :) I think it was normal to have this mid 80's Haros, but I drilled the rear hole of the forks before powdering to accept the recessed bolt.
Front Nippon installed:
...and the rear
Dia Compe Nippon
Well I finally got around to outlining the Dia Compe Nippon text on the calipers using a fine point black Sharpie Oil Paint pen. So it will be nice and permanent :)
A quick reminder of the original state
btw, I guess the Sharpie definition of fine isn't the same as mine...
Half done, Nippon polished out, "Dia Compe" over filled but unfinished...
Turned out ok, but trickier than when they were raw polished.
(Sorry for the dodgy iPhone photos)
A quick reminder of the original state
btw, I guess the Sharpie definition of fine isn't the same as mine...
Half done, Nippon polished out, "Dia Compe" over filled but unfinished...
Turned out ok, but trickier than when they were raw polished.
(Sorry for the dodgy iPhone photos)
Labels:
Dia Compe,
GT Pro Performer,
Nippon,
powder coating
Saturday, August 6, 2011
Friday, August 5, 2011
GT Seat Clamp
Probably the biggest thing left to restore is the GT Seat Clamp. It was in a pretty sad state when I got it, straped, half stripped and reminants of purple over spray. I polished it out as best I could then had it powdered completely white. From there I'll try and restore it as it should be. Part raw aluminium and part white.
Started a little last night on one side of the winged stamps to see how it will turn out.
Looks promising so far...
Started a little last night on one side of the winged stamps to see how it will turn out.
Looks promising so far...
Picking powder
Now that I got the bits back, there a little work to do on the bits.
The first task in had was to tidy up the quick release on the Nippons. There was some minor "overspray" from the powdering on the washer, so it was a quick tidy up picking away the excess powder with a knife. That just leaves the inlay work to do on the Dia Compe Nippon text, but can't do that until the oil paint pens arrive.
One thing I did finish up was the GT Fork standers. Again the rivet was powdered white, so I did the same here picking off the excess powder coat with a sharp knife.
Also completed are the GT Stem and Frame Standers.
Thursday, August 4, 2011
Odyssey Gyro
I managed to get a Gyro friendly Epoch headset, so it looks like I'll be running the Gyro on the build.
Also all the parts are currently homeward bound, should be with me by the end of the week. :)
Also all the parts are currently homeward bound, should be with me by the end of the week. :)
Labels:
Epoch,
GT Pro Performer,
Odyssey Gyro,
powder coating
Subscribe to:
Comments (Atom)


